If you are anything like me, you likely have ten or more programs or applications that are constantly running on your computer. Whether you are working or just using your computer for fun, it can be difficult to juggle multiple tasks while also staying productive. So what is the solution? How can you focus and manage your time more efficiently? To start, try to pinpoint the repetitive tasks you perform every day. Even if these tasks only take a few seconds at a time, they still add up and can hurt the flow of your daily processes. In general, I try to automate the tasks that can be automated and then find ways to make the remaining tasks more efficient, like using helpful keyboard shortcuts. Some repetitive tasks are inevitable, but we can still find ways to speed them up to the point where we don’t even realize we are doing them. My favorite way of doing this is by using a custom application switcher that is easy to build, even easier to use, and completely free.
So what is a “custom” application switcher anyway? And what do I need to build and use it? In the simplest terms, an application switcher is exactly what it sounds like. It quickly switches the program or application that is currently in focus on your computer. This can be useful when you are constantly hopping back and forth between different applications and need a more streamlined way of doing so.
To build the application switcher, you will need a Windows computer, AutoHotkey, and your favorite text or code editor. AutoHotkey (also known as AHK) is a free, open-source Windows program for creating scripts. These scripts can be as simple or complex as you wish and can perform any number of tasks on your computer, including macros, auto-clicking, filling out forms, and more. For our purposes today, we will be using it to remap keyboard keys to open and switch to specific applications.
To get started, download and install AutoHotkey. There isn’t much to the program itself. If you open it after installation, you will see that it is essentially a window that is filled with tutorials and documentation. Reading the documentation within the application or on the AutoHotkey site can be a great way to familiarize yourself with the program and figure out how to use it to write custom scripts. Once you feel comfortable with the general syntax of the scripting language and the functionality of the program, it is time to create our first script file.
Open up your favorite text or code editor. I highly recommend using Visual Studio Code because it is free and has a bunch of useful extensions that can greatly improve your experience with writing code (and scripts). My favorite VS Code extension made for AutoHotkey is AutoHotkey Plus which adds AHK language support, syntax highlighting, and debugging functionality.
Create a new script file and name it whatever you want; just make sure it has the “.ahk” file extension. For this tutorial, I named mine “Switcher.ahk”. If you want your application switcher to automatically run each time you start your computer, place the script file inside the “Startup” folder. To get to the folder, press and hold the Windows key and then press the “R” key to open up the “Run” application. In the input next to the word “Open”, type “shell:startup” and click OK. The “Startup” folder will open up in a Windows Explorer window where you can place your file.
When creating our AHK script, it is important to remember that each script within the script file is generally made up of two components: the key(s) to press in order to perform an action, and then the action itself. The key portion of the script can be a single key or a key combination. AutoHotkey uses the following characters to denote the modifier keys on a keyboard:
Using the above symbols, if we wanted to create a shortcut by pressing Alt + Windows + X, the beginning of the script would look like “!#x::” without the quotes.
Each key or key combination is followed by two colons which are then followed by the action or actions to take. It is completely up to you to decide which keys or key combinations to use in order to switch to your favorite applications. My personal favorite is using the keypad on the right side of a full-size keyboard. If you don’t have a keypad, another option is to use the F1 through F12 keys (however many you wish to use). If neither of those options work for you, try using Windows + Alt + the first letter that your application starts with. Unsure of which to use? Set up a couple of different shortcut methods and see which one feels the most natural to you!
In my application switcher, each shortcut does the following:
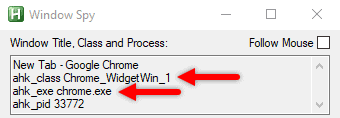
In order to target specific applications, I use the Window Spy application that comes installed with AutoHotkey. Open it up and then open your application. With your application in focus, Window Spy will tell you information about your application that can be used to target it within a script. The most reliable way to target an application is by using the “ahk_exe” or the “ahk_class” property.
Let’s get to writing. With your script file open in your text or code editor, we can start laying out the overall structure of the script. I like to add a comment above each individual script in the file to help me quickly find the application name and what keyboard shortcut it is using. You can add comments to AHK scripts by typing a semicolon followed by the comment. If you are having a hard time deciding on applications to use in your script, try to think of which ones you use the most. I personally use Chrome, Slack, and Spotify frequently while I am working, so those are the ones I started with.
Using the Window Spy application, open your first application and find the value next to “ahk_exe” or “ahk_class” that you plan on using. Remember that this value needs to be unique for each application; otherwise you may run into issues. Some applications share the same “ahk_class” (like Chrome and Slack), so it is best to use “ahk_exe” in those cases.
Under your first comment in the script file, enter the keyboard shortcut you wish to use. To keep this tutorial simple, I will be using the function keys (F1, F2, etc.). In my case, the line will be “F1::” without the quotes.
Below the shortcut, we will use the WinExist function. This function checks if the specified application is running, and if it is, it will perform an action. There is also a negated version that performs an action if the application is not running: !WinExist. In our case, we will use the negated version to run the application if it’s not currently running. For this example, I am using Slack as the application.
The updated script will look something like this:
F1::
If !WinExist(“ahk_exe Slack.exe”)
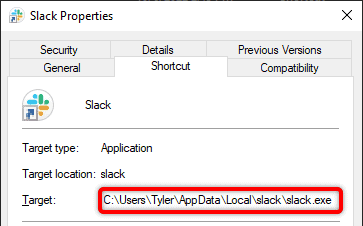
Run, "C:\Users\user\AppData\Local\slack\slack.exe"Notice the Run function being used to launch the application. Some applications will require you to point to the direct path of the executable, while others (like Chrome) will allow you to simply put the name of the file (chrome.exe). If you are having trouble launching your application, follow these steps:
The next part of the script will check if the window does exist using the WinExist function. If it does exist, we want to activate the application by bringing it into focus. The activation piece of the script is done with the WinActivate command, which can be used in conjunction with the WinExist command to automatically activate the application if it exists.
The updated script will look something like this:
F1::
If !WinExist(“ahk_exe slack.exe”)
	Run, "C:\Users\user\AppData\Local\slack\slack.exe"
If WinExist(“ahk_exe slack.exe”)
	WinActivate
This next part is optional, but I find it to be extremely helpful for certain applications. If the application exists and is in focus, we can then perform a specific action in the application when our keyboard shortcut is pressed again. I use this “special action” to cycle through unread messages in Slack, play/pause music in Spotify, and cycle through my tabs in Chrome. The possibilities are pretty much endless, so I encourage you to get creative with your applications and workflows. Let’s see how this extra function can be set up!
In the next line of our script, we are going to utilize the WinActive command. This command checks to see if our application is currently in focus and active. If the application is active, we can perform our specific action. In most cases, this specific action will end up being another keyboard shortcut, but you can perform additional actions as well as long as it is something that AutoHotkey supports. For this example, I am going to be using the keyboard shortcut Alt + Shift + Up (up arrow) in Slack, which navigates to the next unread conversation. In order to perform this keyboard shortcut, I am using the Send command.
The updated script will look something like this:
F1::
If !WinExist(“ahk_exe slack.exe”)
	Run, "C:\Users\user\AppData\Local\slack\slack.exe"
If WinExist(“ahk_exe slack.exe”)
	WinActivate
If WinActive(“ahk_exe slack.exe”)
	Send !+{Up}
Return
At the end of the above example, I have added the word “Return” which lets AutoHotkey know that it should stop executing the script at that point. Every application script that we add to our script file will need to end with “Return” in order for it to function correctly.
Now that we have a fully functional script for a single application, it is time to expand our script to handle other applications as well. I have given you most of the tools to do this on your own, but I will give you one more full example that has a slightly different approach.
F2::
If !WinExist("WinActivate, ahk_exe chrome.exe")
	Run, chrome.exe
If WinActive("WinActivate, ahk_exe chrome.exe")
	Send ^{Tab}
Else
	WinActivate, ahk_exe chrome.exe
Return
In the above example, there are some key differences from the first script. Instead of using three different “If” statements, it only uses two and then utilizes an “Else” statement at the end to activate the application instead. The order of the script is slightly different than the first example, but they both accomplish the same end goal. If you are looking for a script for switching to Chrome and then cycling through your open tabs (by sending Ctrl + Tab), this is a great one to use.
After completing the scripts for your first one or two applications, let’s officially test the application switcher. Save your file and then double-click on it in Windows Explorer to run it. With the script running, try pressing the keyboard shortcuts associated with your applications. If successful, you should be able to launch and switch between your applications with ease.
Let’s walk through my examples above with Slack and Chrome to really understand the workflow. I am working at my computer, and Slack and Chrome aren’t running yet. If I press F1, Slack will open. If I press F2, Chrome will open. If I press F1 again, Slack will become active and in focus. Finally, if I press F1 a third time, it will send the keyboard shortcut to the application to jump to my next unread conversation. If I keep pressing F1, it will keep going to the next unread conversation until there are no more new messages to read. After catching up with my messages, I can press F2 again to switch to Chrome and continue on with my work. Pretty cool, huh?
Thanks for taking the time to read about my custom application switcher using AutoHotkey. Hopefully, I have inspired you to create one on your own to help boost your productivity and streamline your workflows. I recommend starting with a basic version that handles a couple of different applications to start and then adding more as you get more comfortable with using it. Play around with different keyboard shortcuts and “special actions” to really give it a custom feel. Happy scripting!

Stay up to date on what BizStream is doing and keep in the loop on the latest in marketing & technology.