Carousels, also known as sliders or slideshows, are highly requested design elements on many websites. They allow users to see multiple pieces of content in a single, compact space. This blog post will explore the creation of a simple, reactive, and effective carousel using the Swiper.js library and some best practices for writing JavaScript.
Swiper is a popular and well-maintained library for creating carousels and other touch-based sliders. It has several features that make it an ideal choice for creating a carousel, including:
To use Swiper.js to create a carousel, you have two options for using the library:
First, if you plan on isolating your carousel code into a .js file, then install the Swiper library into your project with Node Package Manager:
// Command Prompt
$ npm install swiper
You can see how to use this installed package later in this tutorial in the Custom Example implementation section.
Alternatively, if you would like to serve the Swiper library from a CDN in your HTML file, you can use the following initialization code to import the required styles and JavaScript. Then, insert your Swiper initialization code and specify your desired options.
<link
  rel="stylesheet"
  href="https://cdn.jsdelivr.net/npm/swiper@8/swiper-bundle.min.css"
/>

<script src="https://cdn.jsdelivr.net/npm/swiper@8/swiper-bundle.min.js"></script>

<script>
// JavaScript coded into HTML (if you can format just this part like JavaScript that’d be cool)
var mySwiper = new Swiper('.swiper-container', {
  pagination: {
    el: '.swiper-pagination'
  },
  navigation: {
    nextEl: '.swiper-button-next',
    prevEl: '.swiper-button-prev'
  }
});
</script>
With your Swiper object now initialized, you can create a carousel by adding a <div> element with the class “swiper-container” to your HTML. Here is an example of how you might build the rest of a simple carousel:
<link
  rel="stylesheet"
  href="https://cdn.jsdelivr.net/npm/swiper@8/swiper-bundle.min.css"
/>

<div class="swiper-container">
  <div class="swiper-wrapper">
    <div class="swiper-slide">Slide 1</div>
    <div class="swiper-slide">Slide 2</div>
    <div class="swiper-slide">Slide 3</div>
  </div>
  <div class="swiper-pagination"></div>
  <div class="swiper-button-prev"></div>
  <div class="swiper-button-next"></div>
</div>


<script src="https://cdn.jsdelivr.net/npm/swiper@8/swiper-bundle.min.js"></script>
<script>

<script>
// JavaScript coded into HTML (if you can format just this part like JavaScript that’d be cool)
var mySwiper = new Swiper('.swiper-container', {
  pagination: {
    el: '.swiper-pagination'
  },
  navigation: {
    nextEl: '.swiper-button-next',
    prevEl: '.swiper-button-prev'
  }
});
</script>
Inside the “swiper-container” <div> element, we add another <div> element with the class swiper-wrapper to wrap the group of slides. We then add a <div> element with the class swiper-slide for each slide in the carousel. From here, it’s up to you what goes in them!
Next, we add two additional <div> elements to hold the pagination and navigation buttons (optional). We specify these elements using the pagination and navigation options when we create a new Swiper instance using the Swiper constructor.
A plethora of customizations are available for your Swiper instance. These range from changing the number of shown slides to modifying the class names for wrapper HTML elements. For more information on instance-specific customizability, check out the Swiper API documentation here:
When working with Swiper.js or any other JavaScript library, it is necessary as a modern developer to follow best practices to ensure that your code is maintainable, efficient, and easily approachable. Here are a few tips for writing clean and effective JavaScript:
We have seen basic Swiper code and taken a look at JavaScript best practices. Now let us take a quick look at a complex carousel implementation: a timeline web component. Here is a short gif demonstrating a client-requested timeline with full functionality:
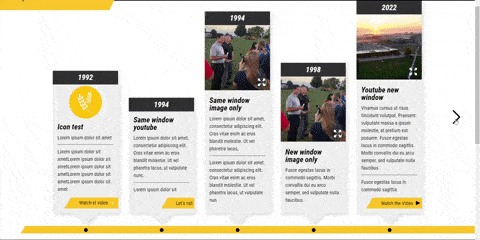
As you can see, Swiper works effectively for any project requiring a responsive moving window of slides or cards. Additionally, most of the work behind creating this timeline was the styling portion and interfacing links with Modaal, another JavaScript library that creates the modal functionality seen in the gif above. Here is the custom element Swiper initialization code used for this production-ready timeline:
import Swiper, { Navigation, Pagination } from 'swiper';

class Timeline extends HTMLElement {
  constructor() {
    super();

    // Swiper Elements
    this.timeline = this.querySelector('.timeline-wrapper');
    this.swiperButtonNext = this.querySelector('.swiper-button-next');
    this.swiperButtonPrev = this.querySelector('.swiper-button-prev');
  }

  // Fires when <timeline> element is inserted into the DOM
  connectedCallback() {
    this.initTimeline();
  }

  initTimeline() {
    if (this.timeline != null) {
      this.swiper = new Swiper(this.timeline, {
        modules: [Navigation, Pagination],
        direction: 'horizontal',
        slidesPerGroup: 5,
        slidesPerView: 5,
        spaceBetween: 30,
        speed: 1000,
        navigation: {
          nextEl: this.swiperButtonNext,
          prevEl: this.swiperButtonPrev
        }
      });
    }
  }
}
customElements.define('custom-timeline', Timeline);
Since we are using custom elements, we can now define a timeline anywhere in our HTML simply:
<custom-timeline>
    <div class="timeline-wrapper">
        <div class="swiper-wrapper">
            <div class="swiper-slide">
                Slide 1 Content
            </div>
            <div class="swiper-slide">
                Slide 2 Content
            </div>
            <div class="swiper-slide">
                Slide 3 Content
            </div>
        </div>
    </div>
</custom-timeline>
As you can see, even in complex situations, the Swiper library is easy to use. It requires minimal JavaScript, so you can focus more on styling your sliding web components than dealing with daunting vanilla JavaScript. As an aside, you may notice that I did not include the code for the lightbox/modal functionality highlighted in the gif. This was done to simplify our code sample and isolate timeline-specific functionality.
Before using Swiper on your own, ensure you have the API documentation ready; it will be of much help paired with the examples above. Best of luck in your Swiper adventures, and godspeed!
Stay up to date on what BizStream is doing and keep in the loop on the latest in marketing & technology.