In today’s fast-paced digital world, automating repetitive tasks is key to enhancing productivity and efficiency. One common task many of us face is the need to create copies of a Google Drive file, such as a Google Sheet, and share them with specific users or teams. Whether you’re managing project templates, generating reports, or distributing resources, the manual process can be time-consuming. Fortunately, with Google Apps Script, a powerful scripting platform developed by Google, we can automate these tasks seamlessly. In this tutorial, we’ll walk through the process of creating a Google Apps Script that copies a Google Drive file, sets specific permissions, and shares it with designated users or groups. We’ll cover everything from setting up your script project to deploying it as a web application that can be called from any web app, making your document management process a breeze.
Navigate to Apps Script and create a new project by clicking on “New Project.” This is your workspace where the magic of automating Google operations begins. Rename your project at the top of the page to give a basic description of its purpose. As a final step to prepare your workspace, delete the default myFunction() declaration so that you have a clean slate.
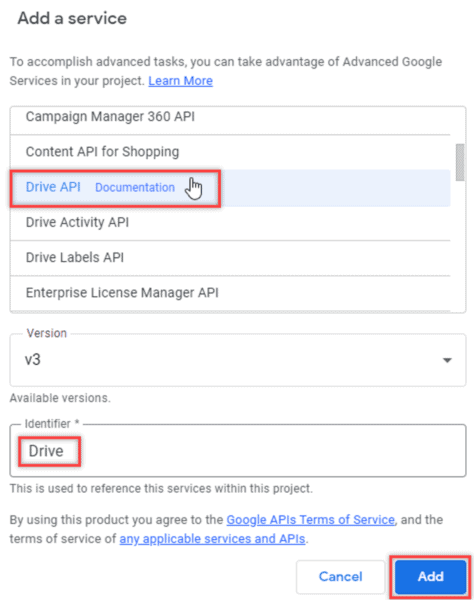
If you plan on setting specific permissions on your copied file, it is best to enable the “Drive API” service within your project. Enabling it allows your script to communicate with the Google Drive API and adds additional functionality and methods for automating file management in Google Drive. To enable the service, follow these simple steps:
Choose a Google Sheet (or any Google Drive file) as your template. For this tutorial, I will be using a Google Sheet. This file should be set up with any structure or data that you want as the starting point for all the copies that will be created. Note the file’s ID from its URL, which uniquely identifies it on Google Drive. If you aren’t sure how to get the ID, open the file. The ID is the value in the URL between the /d/ and /edit. Copy this value for the next step.
Now that our template file is ready, it’s time to create the main function for making a copy. I will be providing code snippets, but please reference the Apps Script documentation if you run into any issues or want to explore other methods and options for manipulating files.
This is self-explanatory, but we need to declare the function first. Give it a useful name, or use the name from this example. I am also passing in a parameter for projectName. Since we are making copies and placing them in the same folder, we want a way to name the new files differently. For my use case, I am using a project name for each file copy.
					function copyAndConfigureFile(projectName) {
// Function body code goes here!
}
Define the IDs of your template file and the destination folder at the beginning of your function. The ID for the folder can be found similarly to the file ID. Open the folder in Google Drive and copy the value after /folders/. After defining the IDs, define the file and folder by referencing them via their IDs.
					var templateFileId = '1234567890abcdefghijklmnop';
var parentFolderId = 'abcdefghijklmnop1234567890';
var templateFile = DriveApp.getFileById(templateFileId);
var parentFolder = DriveApp.getFolderById(parentFolderId);
Name your file by setting a name variable. If you plan on using a parameter for a unique name, make sure you use it in this step. Use the template and parent folder references to make a copy of the template, placing it into the desired folder and renaming it dynamically.
					var newName = projectName + ' Budget Tracker';
var copiedFile = templateFile.makeCopy(newName, parentFolder);
If you need to set permissions on your file for specific email addresses, then add the general code structure below and update the emails array. In this example, I am setting edit permissions for the specified email addresses by setting their role to “writer.” I am also setting sendNotificationEmail to “false,” which prevents emails from being sent to users, letting them know that a new file has been shared with them. If you prefer having these emails sent, set the value to “true”.
					var emails = ['john@gmail.com', 'emma@gmail.com']; // Adjust as needed
emails.forEach(function(email) {
Drive.Permissions.create({
'type': 'user',
'role': 'writer',
'emailAddress': email
}, copiedFile.getId(), {
'supportsAllDrives': 'true',
'sendNotificationEmail': 'false'
});
});
If your file needs broader access, like domain-wide editing rights, this can be set with a single line of code. In this example, I am setting edit access for all domain users within my organization’s Google Workspace.
copiedFile.setSharing(DriveApp.Access.DOMAIN, DriveApp.Permission.EDIT);
If you want your function to return a value, such as the URL of the newly copied file, reference the code below. The copied Google Sheet had some unnecessary text at the end of the URL, which I removed before returning the value.
					var fileUrl = copiedFile.getUrl().replace("/edit?usp=drivesdk", "");
return fileUrl;
Below your main copy function, we need to add a doPost function to expose the main function as a web app. Apps Script requires the function to be named this way so that the function is callable via HTTP POST requests. Remember to pass the projectName parameter (or whichever parameter you decide to use).
					function doPost(e) {
var projectName = e.parameter.projectName;
var resultUrl = copyAndConfigureFile(projectName);
return ContentService.createTextOutput(JSON.stringify({'url': resultUrl}))
.setMimeType(ContentService.MimeType.JSON);
}
Before deploying your script, test it within Apps Script to ensure it functions as expected. At the top of the code editor, make sure your main copy function is selected in the function drop-down, and then click “Run.” If everything is set up correctly, the function should complete, and your template file will be copied. Remember to delete extra file copies as you test. Use the debugger or log statements to troubleshoot any issues you may run into.
Use an API client like Postman or Thunder Client to test your web app.
Test the API call and make sure the file is copied as you expect.
					axios.post('YOUR_WEB_APP_URL', `projectName=${encodeURIComponent('Demo Project')}`, {
headers: {
		'Content-Type': 'application/x-www-form-urlencoded'
	}
})
	.then(response => console.log('Copied file URL: ', response.data.url))
	.catch(error => console.error('Error: ', error));
Throughout this tutorial, we’ve explored the powerful capabilities of Google Apps Script to automate the process of copying a Google Drive file, such as a Google Sheet, and configuring how it is shared. By breaking down the process into manageable steps, we’ve demonstrated how easily you can streamline your document management tasks. This automation not only saves valuable time but also minimizes the risk of human error, ensuring consistency and efficiency in how resources are distributed within your team or organization. As you’ve seen, Google Apps Script opens up an endless world of possibilities for automating workflows across Google’s many applications and services. I encourage you to experiment further with Apps Script, exploring its extensive documentation and community resources to discover new ways to automate your workflows and make your daily tasks more efficient. Happy scripting!

Stay up to date on what BizStream is doing and keep in the loop on the latest in marketing & technology.