Kontent.ai is a robust and easy-to-use Headless Content Management System. One of the great features of Kontent.ai is its extensibility through Custom Elements. These custom elements are simply separate, self-hosted web applications that can connect to Kontent.ai using the Custom Elements JS API. This allows integration with any other system and the ability to create any type of custom editing experience as long as it can be implemented in another web application.
To demonstrate how custom elements work, we will walk through how to implement a web page that generates a random color using an external API. First, we will create a project using npm. Then we need to create a simple server to host our page. Then we will create our page and client-side code for the UI, external API integration, and connection to Kontent.ai.
We will outline the code for each step of the process as we go, but if you want to see the complete source code, it is hosted in BizStream’s GitHub repository here.
To set up a new project make sure to have Node and npm installed (or a similar package manager, like yarn). Note that setting up a project using npm is not necessary in order to have a working Kontent.ai element, but we will create one here so that we can easily install packages and host our element locally for testing using Node.
After verifying that Node is installed, run the following in the command line:
npm init
Follow the prompts or accept the defaults as desired, and a new package.json file will be generated. Here is an example of the one we generated:
					{
  "name": "kontent-color-randomizer",
  "version": "1.0.0",
  "description": "A Kontent Custom Element for generating random color data",
  "main": "server.js",
  "scripts": {
    "test": "echo \"Error: no test specified\" && exit 1"
  },
  "author": "BizStream",
  "license": "MIT"
}
For the web app and the main functionality of our Kontent.ai element, we will create a basic web page. We will also use Alpine to help us add functionality quickly for the UI.
Here is the markup, saved to index.html:
					<!DOCTYPE html>
<html lang="en">
  <head>
    <meta charset="UTF-8" />
    <title>Color Randomizer</title>

    <!-- Custom Element API from Kontent -->
    <script src="https://app.kontent.ai/js-api/custom-element/v1/custom-element.min.js"></script>

    <!-- Alpine -->
    <script src="//unpkg.com/alpinejs" defer></script>

  </head>
  <body>
    <style>
      .container {
        align-items: center;
        display: flex;
        flex-direction: column;
        gap: 1rem;
        justify-content: center;
      }

      .color-bg {
        height: 10rem;
        width: 10rem;
      }
    </style>

    <!--
    Note the use of Alpine "x-data" and other directives in the markup here.
    To learn more about Alpine, go to https://alpinejs.dev/
    -->
    <div x-data="color" class="container">
      <div class="color-bg" :style="{background: colorHex}"></div>
      <p>Color Name: <span x-text="colorName"></span></p>
      <button @click="getRandomColor" :disabled="disabled">Generate Random Color</button>
    </div>

    <script type="text/javascript" src="./main.js"></script>
  </body>
</html>
This simple page contains a div with the random background color, text showing a random color name, and a button we can use to fetch new random colors.
Next, we need to add the code to make the UI interactive and allow querying the cloud service for random colors.
For querying the API we will use the fetch method implemented in all modern browsers.
					// main.js

const API_ENDPOINT = 'https://random-data-api.com/api/color/random_color';

function fetchRandomColor() {
  /*
  The response data from the endpoint is in the following format:
  {
    id: number,
    uid: string,
    hex_value: string, // ex. "#baa4e7"
    color_name: string, // ex. "plum"
    hsl_value: number[], // ex. [127, 0.21, 0.76],
    hsla_value: number[] // ex. [235, 0.38, 0.1, 0.9],
  }
  */

  return fetch(API_ENDPOINT)
    .then(response => response.json());
}
Here is how we implemented our UI logic and code that connects to Kontent:
// main.js

function init() {
  // Set size of Custom Element viewport in Kontent with some extra space for good measure
  CustomElement.setHeight(
    document.querySelector('.container')
      .getBoundingClientRect()
      .height + 50
  );

  // Initialize the Alpine data and other UI functionality
  Alpine.data('color', () => ({
    colorHex: '',
    colorName: '',
    disabled: true,

    init() {
      // First we need to initialize the element in Kontent and connect everything up
      CustomElement.init(element => {
        const { value, disabled } = element;

        // The saved value from Kontent comes in as a string, so
        // we will deserialize it first, giving it a default
        // value in case there is no value yet.
        const {colorHex, colorName} = JSON.parse(value) ?? {
          colorHex: "#ffffff",
          colorName: "(none)"
        };

        // Update state values
        this.disabled = disabled
        this.colorHex = colorHex;
        this.colorName = colorName;
      });

      // This callback will be called when the element is disabled or enabled in Kontent
      // (ex. when publishing or creating a new version)
      CustomElement.onDisabledChanged(isDisabled => this.disabled = isDisabled);
    },

    getRandomColor() {
      fetchRandomColor().then(data => {
        // Update state values
        this.colorHex = data.hex_value;
        this.colorName = data.color_name;

        // Save the updated data as a JSON string in Kontent
        CustomElement.setValue(JSON.stringify({
          colorHex: data.hex_value,
          colorName: data.color_name
        }));
      });
    }
  }));
}

// Wait until Alpine is initialized, then initialize our app
document.addEventListener('alpine:init', () => init());
Now that the web app is completed, we need to be able to serve it up from a web server. As mentioned previously, we will use Node and Express, running locally, to handle this. Run npm install express –save to install Express and save it as a dependency in our project.
Here is the code we will use for our Express server, saved to the file server.js:
					// server.js

const express = require('express')
const app = express()
const port = 8000

app.use(express.static('.'))

app.listen(port, () => {
  console.log(`Custom Open Search element page listening on port ${port}`)
})
With both the web app and server written, the final step is to test it in Kontent.ai. Kontent.ai will show our web app in an iframe in the editor and communicate with our app using the iframe API mentioned previously. Kontent.ai also requires our app to be on a secure connection.
We can test this locally using Ngrok. Ngrok is a service that acts as a tunnel, and we can use it to point Kontent.ai to our computer and Node server running on localhost. First, enter node server.js to start our local server, then, in a separate command line instance, run ngrok HTTP localhost:8000 to get the tunnel set up:
Ngrok will then create and print a random, unique address for the tunnel. Copy the HTTPS address, which will be entered into Kontent.ai as the web location of our app.
Now we need to create a new custom element in Kontent.ai and point it to our application. To do this, first log into Kontent.ai.
To make the custom element reusable for any content type we will create a new Content Type Snippet, under the Content model section. We have named our snippet Color Randomizer.
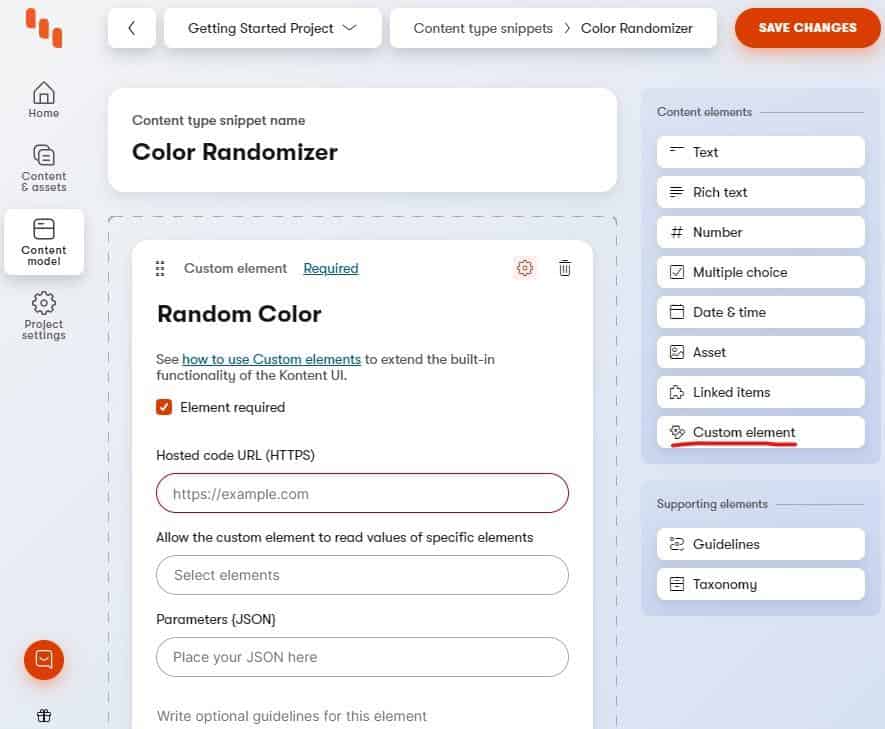
We will then add a Custom Element field. Upon adding this field, there are a few parameters that we can enter. The Hosted code URL (HTTPS) field is where we will paste the address created by Ngrok, which we copied in the previous step. There are also two other fields, which are used for specifying other Kontent.ai element names and holding configuration data, respectively. The element names are for Kontent.ai elements that the custom element code should be given access to. The configuration data, formatted as JSON, is for other data the web app can pull in and use if needed, such as API Keys or other initialization values. We will not need those for this example, so make sure to paste the Ngrok address into the respective field, save the snippet, and go back to the main Content Model section.
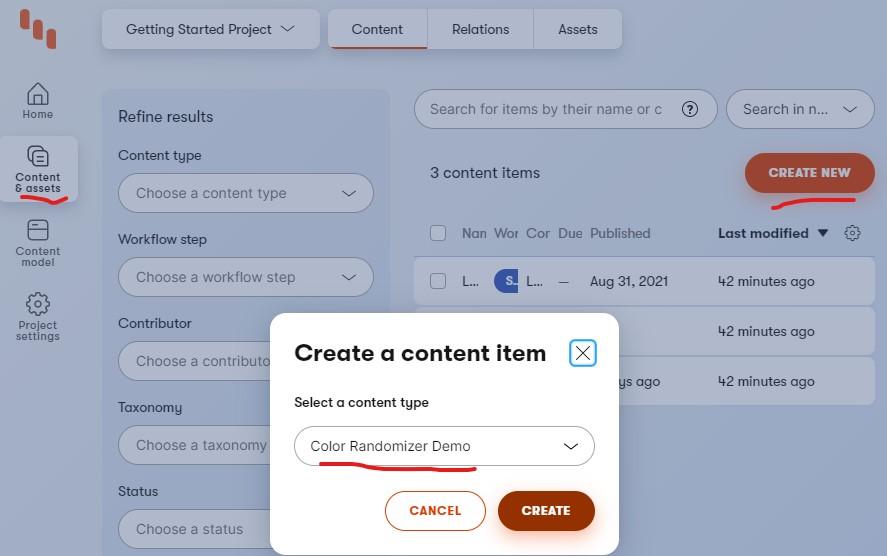
Now, create a new model where our snippet and custom element will be used. We called our model Color Randomizer Demo. Add a Content Type Snippet element and select the snippet we created earlier from the drop-down.

The last and final step is to create an item that uses the custom element and see it in action. Go to the Content & Assets tab on the left, click the Create New button in the top-right corner and choose to create a new Color Randomizer Demo element.
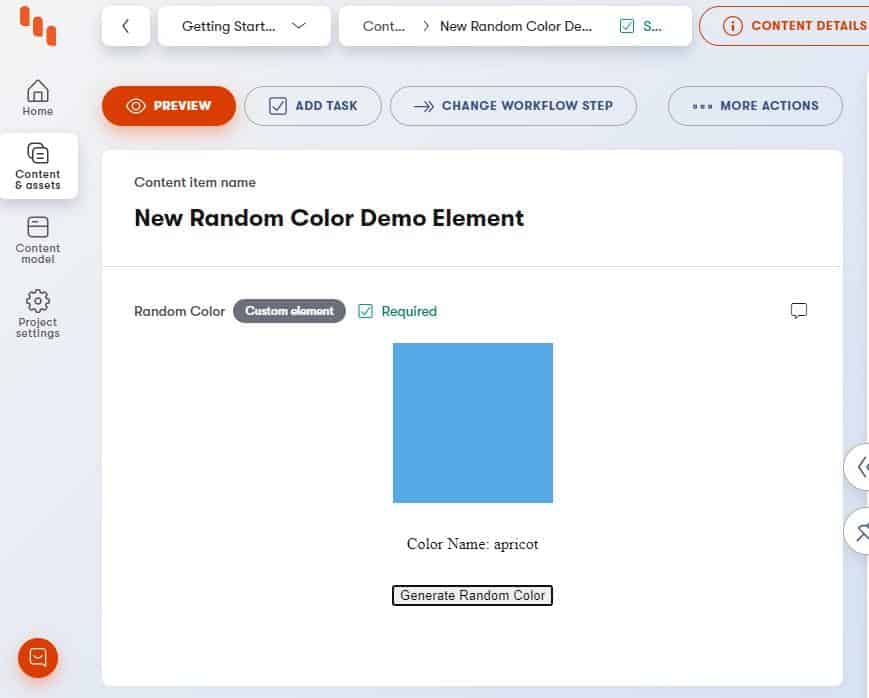
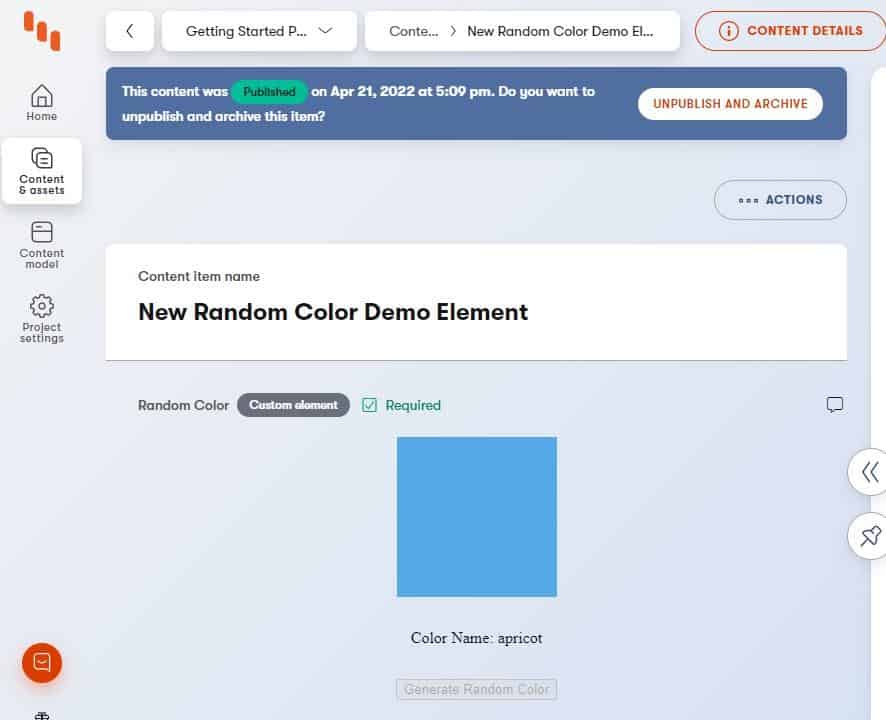
Here we can see that we start out with no color, but then as we click the button, new colors are randomly generated and saved in Kontent.ai. If we then Publish the element, the button becomes disabled, using the callback we implemented until we create a new version.
This is a simple example of what can be created using Custom Elements inside Kontent.ai, but it is an example of the freedom that developers have to create any kind of integration and editing experience, as long as it can be implemented and hosted in a web application. This is just one of the many reasons for choosing Kontent.ai as a Headless Content Management platform.

Stay up to date on what BizStream is doing and keep in the loop on the latest in marketing & technology.