In the ever-evolving landscape of digital experience platforms, staying up-to-date with the latest advancements is of utmost importance! In this blog post, we’ll navigate the transition process from Kentico 12 to Kentico 13, uncovering strategies, tools, and insights that will empower you to migrate content while upgrading your site. If you’re a developer, content administrator, solution architect, or business owner, get ready to unlock the secrets to making your Kentico 12 to 13 content migrations a breeze, ensuring your digital presence remains up-to-date with as little interference as possible.
Migrating content between different versions of a digital platform can be a complex undertaking, and Kentico 12 to 13 migrations are no exception. In this section, we’ll establish the ground rules that will serve as the foundation for your migration process.
Our migration journey encompasses various elements, ranging from custom tables and content tree items/pages to settings and resource strings. The goal is to ensure a complete transition of your content and configurations. However, it’s important to note that the content you wish to migrate must be accessible through the Kentico API. This criterion ensures that the migration process can interact with and extract the necessary data from the source Kentico 12 database.
While the migration process covers a wide spectrum of content types, it’s essential to acknowledge that content cannot be directly migrated into Kentico 13 widgets. Widgets, being a distinct and dynamic feature of Kentico 13, require a different integration approach. As such, our migration focus lies on other content elements within the platform.
To execute a successful migration, you must have access to both the source database of your Kentico 12 instance and the destination database of Kentico 13. These databases contain the relevant information that needs to be extracted and imported during the migration process. When running migrations in development, I recommend having backups and local copies of the source and destination databases. That way, if there is ever a need to restore either database to its pre-migratory state, it can be done simply using a SQL tool like SQL Server Management Studio (SSMS).
A reliable tech stack is essential when embarking on the journey of migrating content from Kentico 12 to 13. Visual Studio 2022 stands as the cornerstone IDE of our tech stack. We use Visual Studio 2022 for its usefulness in managing NuGet packages, project secrets, debugging, unit testing, etc.
C# emerges as the programming language of choice for driving the migrations, establishing database connections, and mapping models from old to new.
Finally, the role of (SSMS) is crucial. This tool enables you to interact with the source and destination databases, executing queries, inspecting data, and managing database schema. SQL queries are the backbone of the export process in these migrations.
Throughout this guide, we’ll use specific terminology to distinguish between the stages of migration. The process of extracting information from the Kentico 12 “source” database will be referred to as the “export” process. Conversely, the process of inserting this information into the new Kentico 13 “destination” database will be referred to as the “import” process. Understanding these terms will help you navigate the migration steps with clarity and confidence.
In the following sections, we’ll delve deeper into the intricacies of each migration stage, providing insights and strategies to ensure a smooth transition from Kentico 12 to 13.
Before undertaking any coding efforts, it is beneficial to discuss with your team and/or clients about what content needs to be migrated from the old Kentico 12 site. Creating a full list of custom tables, settings, resource strings, page types, and other content will be essential to establishing a migration scope and strategy.
Now that you have a grasp on individual items that need to be migrated, you can get started with your first migration! Start by cloning the BizStream Migrations Repository from GitHub. We’ll be working directly with the source code there to create a comprehensive command-line script for your migratory needs. If you’re interested in a fast-tracked lesson, you can check out the feature/blog-post branch, which has the code updates outlined in the rest of this blog.
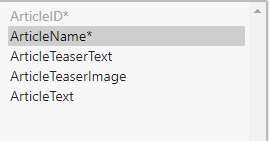
The example migration that we’ll be following today details the migration of “Article” pages from the K12 site to K13. The “CMS.Article” page type is built-in and has these content fields in Kentico 12:
A few things we’ll need to ask ourselves before heading over into the source code are:
1. Will our new page type have the same fields in the new site? If not, what will be the differences between those fields?
For the sake of simplicity, our example migration will have the same fields/field types in the new site’s “Article” page type. The only thing we will change is the page type name, to “MySite.Article”
2. Do we want ALL of the “CMS.Article” pages from the old site to be migrated? If not, how can we filter the articles down to only the ones that we want?
Let’s assume that there are hundreds, even thousands, of articles on the old site. Some of them date back to almost 10 years ago! Some clients may specify that they only want to bring over articles created in the last 3 years (2020 or later). This is important information to consider during the export process! For this sample case, we’ll be migrating all articles.
3. Where do we want all of the Articles to end up in the content tree on the new site?
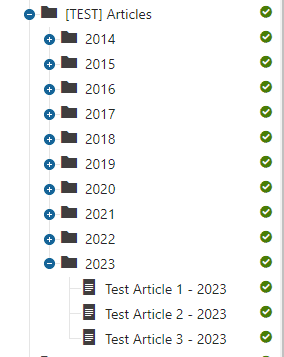
Let’s assume that the articles in the old site are organized by year as follows:

We want articles to migrate to the new site in the same structure: organized under a “year” folder. Those “year” folders will be under a parent folder called “Articles.”
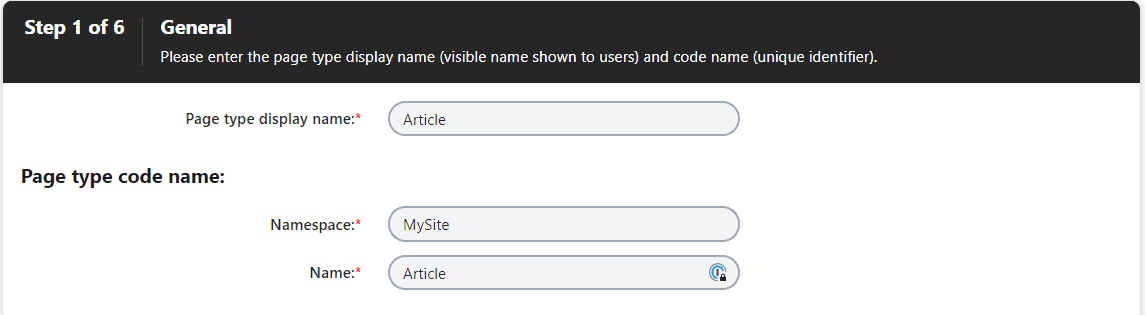
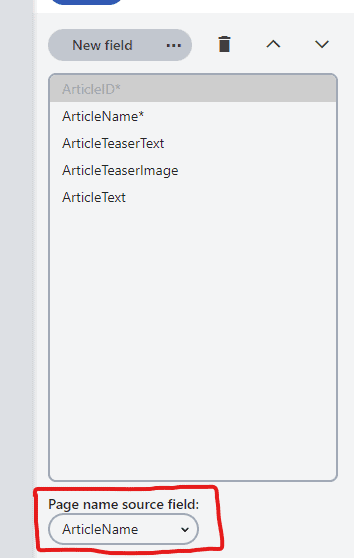
Now that we’ve squared away some important questions about the scope of our migration, let’s take a look at the new site. First things first, we’ll need to build out our “Article” page type here, with the same fields and field types as on the old site. Here’s how I’m naming mine:
As expressed before, we add the same fields to this page type as on the old page type:

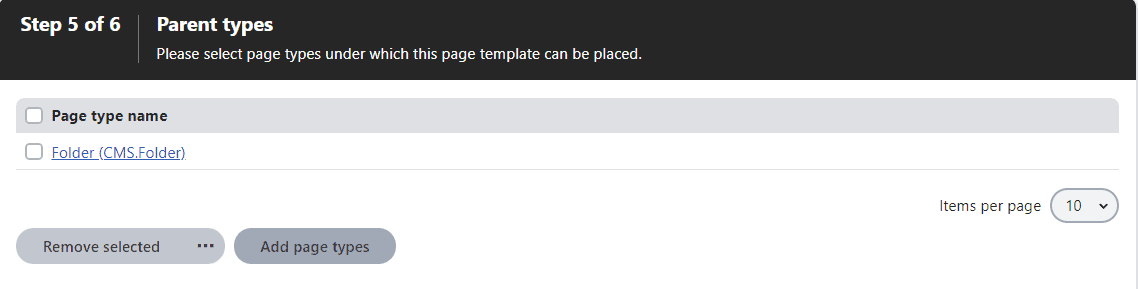
Finally, make sure you choose “CMS.Folder” as an allowed parent type:
Now your page type is all set up and ready to go on your new site. Before we continue any further, though, make sure that you are able to add an article under a folder in the content tree. Additionally, go ahead and create the parent folder for all of our articles in the content tree:
Now we have completed the necessary steps to get our new Kentico instance prepared for the article migration. It’s time to dig into some code!
As stated earlier, you’ll first want to clone the BizStream Migrations Repository down to your local machine. Make sure this machine has sufficient access to the source and destination sites’ databases before continuing!
Inside the repository, you’ll find a Visual Studio solution file named Migrations.sln. Open that up to see the project’s files!
I’ll begin by recommending that you read/keep open the project’s README.md file, as I will be following its setup steps exactly as described, providing insight as we go along.
First, I rebuilt my Kentico 13 web app’s CMSApp.csproj project to make sure everything in my Kentico instance is up-to-date.
Second, we need to add our database connection strings. I created connectionStrings.config at the root of the repository and copy-pasted the skeleton code from the Readme:
<connectionStrings>
	<add name="CMSConnectionString" connectionString="<your_connection_string_here>" />
</connectionStrings>
I then replaced the connection string with that of my Kentico 13 (destination) database. If you’re wondering where to find this connection string, the easiest place would be to check your web application’s CMS/Web.config file.
Next, we need to add our source connection string. Once again, I followed the Readme and added a user secret to the project by copy-pasting the skeleton code and changing out the connection string:
{
"ConnectionStrings:ExportCMSConnectionString": "<your_connection_string_here>"
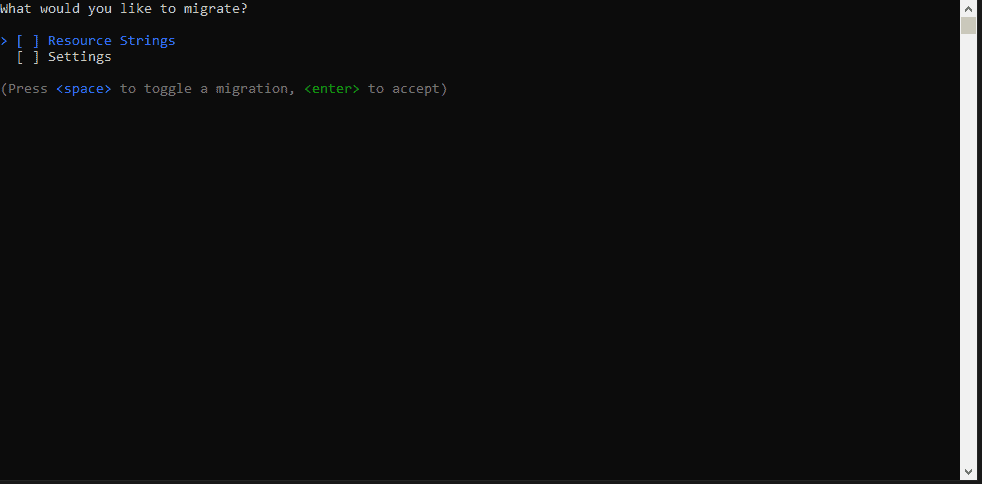
}Now that you’ve added database connection strings, we can dive deeper into the code base. Before we do, make sure the project successfully builds and when you run it, you see a terminal open that looks like this (You might have to hit “Enter” if there isn’t any text showing):
Let’s add a new migration option for our Articles. Remember to follow along with the Readme open.
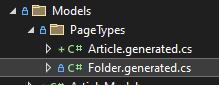
First, we’ll add the generated code to our solution for the Article page type that we created in Kentico 13. Under Models/PageTypes, I simply created a Article.generated.cs and copy-pasted the page type code straight from Kentico into that file:
Note: If you already have generated Kentico models in another class library, just add that library as a reference to this project, and you can use the code from there!
To retrieve data from the Kentico 12 database, let’s create a SQL query. There are a few fields that are absolutely necessary to retrieve because we are using these fields to insert into the new database through the Kentico API. These fields are:
Given this information, we can craft a basic query:
SELECT
	 t.NodeName
	,t.NodeAlias
	,t.NodeAliasPath
	,p.NodeAliasPath as 'ParentNodeAliasPath'
FROM View_CMS_Tree_Joined t
INNER JOIN View_CMS_Tree_Joined p
ON t.NodeParentID = p.NodeID
WHERE t.ClassName = 'CMS.Article'
We query against View_CMS_Tree_Joined because it contains all of those required TreeNode fields we identified above. This is all great, but we also need information specific to our Article page type! To get those columns, we just need to join on the Article table:
SELECT
t.NodeName
,t.NodeAlias
,t.NodeAliasPath
,p.NodeAliasPath as 'ParentNodeAliasPath'
,a.ArticleTeaserImage
,a.ArticleTeaserText
,a.ArticleText
FROM View_CMS_Tree_Joined t
INNER JOIN View_CMS_Tree_Joined p
ON t.NodeParentID = p.NodeID
INNER JOIN CONTENT_Article a
ON a.ArticleID = t.DocumentForeignKeyValue
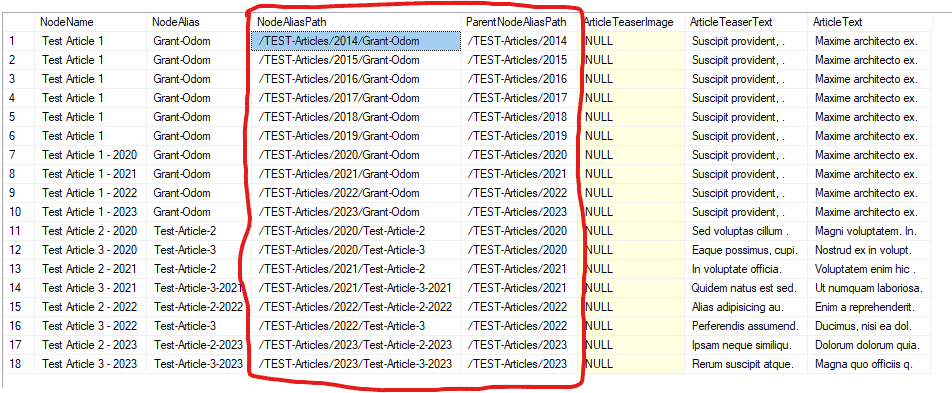
WHERE t.ClassName = 'CMS.Article'My results from this query are:
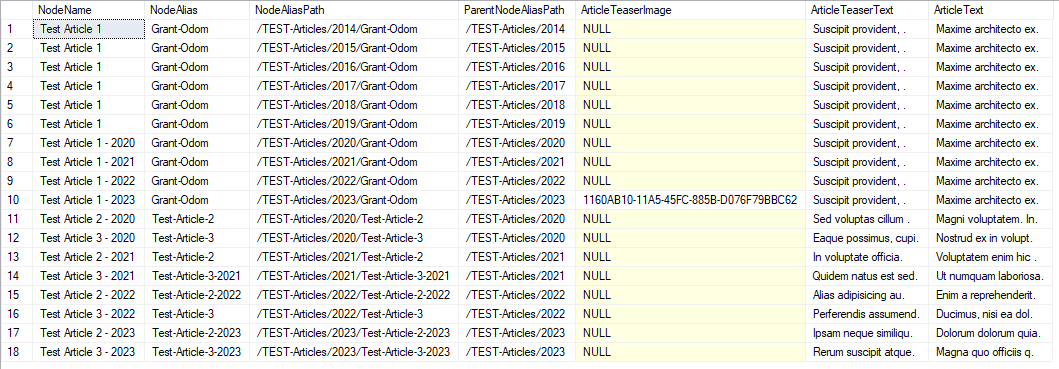
Aside from the obvious lazy replication of data for this test scenario, this looks like everything we need to continue with our migration!
Note: For the sake of simplicity, I will be disregarding the content of the ArticleTeaserImage column for the rest of this example. There certainly are ways to successfully migrate images, but it requires extra migratory steps to download/upload images to and from both instances of Kentico.
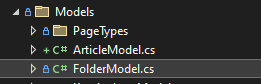
Above is the generated model for importing data into Kentico 13. Our code will eventually map data from the old site to this final model before inserting a new node in the tree. However, we need a model for the data from the old site (hint: for this use case, since no field names change, they will basically be the same models!)
Add a model class for the data we’ll be pulling in from the old site. The model looks simple:
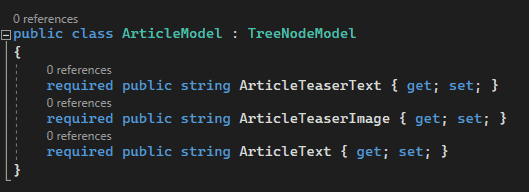
As you can see, we’re inheriting from the TreeNodeModel class because that class has a few fields that are common between all page types (TreeNodes) and are necessary when inserting pages/nodes through the Kentico API. You may also be confused as to why we’ve omitted the “ArticleName” field. That is because we are using “ArticleName” as the page name source for the Article page type. This causes the database representation of Articles to store the value of “ArticleName” in a field called “NodeName” instead, which is common between all TreeNodes.The “NodeName” field is seen in “TreeNodeModel”, so we’re covered for that field.
Let’s now add a new repository file under /Repositories called ArticleRepository.cs. The repository files are used to define and abstract the retrieval and insertion of data from databases.
public class ArticleRepository : SqlToTreeNodeRepository<ArticleModel, Article>
{
    protected override string SqlQuery => @"SELECT
	                                             t.NodeName
	                                            ,t.NodeAlias
	                                            ,t.NodeAliasPath
	                                            ,p.NodeAliasPath as 'ParentNodeAliasPath'
	                                            ,a.ArticleTeaserImage
	                                            ,a.ArticleTeaserText
	                                            ,a.ArticleText
                                            FROM View_CMS_Tree_Joined t
                                            INNER JOIN View_CMS_Tree_Joined p
                                            ON t.NodeParentID = p.NodeID
                                            INNER JOIN CONTENT_Article a
                                            ON a.ArticleID = t.DocumentForeignKeyValue
                                            WHERE t.ClassName = 'CMS.Article'";

    public ArticleRepository(IOptions<ExportOptions> exportOptions, IMapper mapper)
        : base(exportOptions, mapper)
    {
    }
}
The important parts here are in the class inheritance signature. Our ArticleRepository is a SqlToTreeNodeRepository, meaning it retrieves data from a SQL query and converts that data to a TreeNode to be inserted into the Kentico content tree. Moreover, it is a SqlToTreeNodeRepository<ArticleModel, Article>, so it will convert the results of our SQL query into an ArticleModel (using a C# package called Dapper), map that model to an Article (using another C# package called AutoMapper), then insert that Article into the Kentico 13 content tree according to the “Insert” function defined in SqlToTreeNodeRepository. Check out the inheritance hierarchy and base methods to get a better understanding of what’s happening under the hood.
Before moving on to the next step, make sure you paste in your SQL Query.
We’ll now define an AutoMapper mapping profile for mapping from our ArticleModel to an Article. To do so, we’ll add a new ArticleMappingProfile.cs under /Mappings:
public class ArticleMappingProfile : Profile
{
    public ArticleMappingProfile()
    {
        CreateMap<ArticleModel, Article>();
    }
}
Since our ArticleModel and Article page type have the same field names, AutoMapper can figure out which field maps to which between the two types, allowing us to have a very simple mapping declaration. For more information on how AutoMapper profiles work, check out their documentation.
public const string Articles = "Articles";Finally, we’ll add a ArticlesMigrator.cs class under /Migrators:
[Migrator(MigrationOptions.Articles)]
public class ArticlesMigrator : IMigrator
{
    private readonly ArticleRepository articleRepository;

    public ArticlesMigrator(ArticleRepository articleRepository)
    {
        this.articleRepository = articleRepository;
    }

    public void Migrate()
    {
        var articles = articleRepository.RetrieveAll();

        AnsiConsole.WriteLine($"Retrieved Article models from old site. Inserting into the new site...");

        articleRepository.InsertAll(articles);
    }
}
The [Migrator(MigrationOptions.Articles)] attribute registers this migrator into the terminal and tells the application to call this migrator’s Migrate() method if its corresponding option is selected in the terminal.
We’re done adding code for article migrations! Make sure your solution builds, run it, select Articles in the terminal, and hit “enter”! But wait… I’m getting this error:
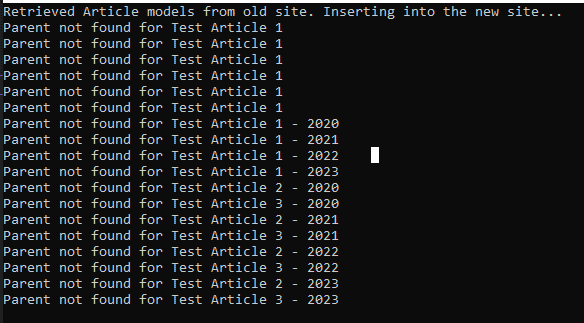
The parent nodes for these articles can’t be found in the Kentico 13 content tree because they don’t exist! Remember, each article needs to be placed under a folder with the year the article was published, just like in the old site! Let’s take a quick look at the ParentNodeAliasPath field of our articles in our SQL query:

Two things: our new site’s main folder has a NodeAlias of “Articles,” not “TEST-Articles,” and none of the “year” folders exist under the new site’s “Articles” folder! We need to migrate those folders before we migrate our News Articles. The good thing is that we can add that migration to happen inside of our ArticleMigrator.cs. Let’s do that real quick, following the steps from the Readme again:
1. Add the Folder generated page type: it already exists
2. Create a SQL Query to grab folders from the old site, but format the alias paths to be accurate for the new site:
SELECT
	 t.NodeName
	,t.NodeAlias
	,'/Articles/' + NodeAlias as 'NodeAliasPath'
	,'/Articles' as 'ParentNodeAliasPath'
FROM View_CMS_Tree_Joined t
WHERE ClassName = 'CMS.Folder'
AND NodeAliasPath LIKE '/TEST-Articles/%'
3. Add a FolderModel in /Models: it already exists!
4. Add a new repository for the specific folders we’re migrating. Note: There is an existing FolderRepository that we can inherit from to make our lives even easier:
public class ArticleFolderRepository : FolderRepository
{
    protected override string SqlQuery => @"SELECT
	                                             t.NodeName
	                                            ,t.NodeAlias
	                                            ,'/Articles/' + NodeAlias as 'NodeAliasPath'
	                                            ,'/Articles' as 'ParentNodeAliasPath'
                                            FROM View_CMS_Tree_Joined t
                                            WHERE ClassName = 'CMS.Folder'
                                            AND NodeAliasPath LIKE '/TEST-Articles/%'";
    public ArticleFolderRepository(IOptions<ExportOptions> exportOptions, IMapper mapper)
        : base(exportOptions, mapper)
    {
    }
}
5. Copy-Paste in the SQL Query from Step 2.
6. Add a mapping profile for Folders: it already exists!
7. Add a new MigrationOption: we don’t need to since we’re combining this migration under the Articles option!
8. Add a new Migrator: we don’t need to since we’re combining this migration with our existing ArticlesMigrator!
9. Add the new repository with constructor dependency injection to our ArticlesMigrator, and call its methods from Migrate():
[Migrator(MigrationOptions.Articles)]
public class ArticlesMigrator : IMigrator
{
    private readonly ArticleRepository articleRepository;
    private readonly ArticleFolderRepository folderRepository;

    public ArticlesMigrator(
        ArticleRepository articleRepository,
        ArticleFolderRepository folderRepository)
    {
        this.articleRepository = articleRepository;
        this.folderRepository = folderRepository;
    }

    public void Migrate()
    {
        var folders = folderRepository.RetrieveAll();
        var articles = articleRepository.RetrieveAll();

        AnsiConsole.WriteLine($"Retrieved Article models from old site. Inserting into the new site...");

        folderRepository.InsertAll(folders);
        articleRepository.InsertAll(articles);
    }
}
That was the last step for folders! If I run the migration now, here’s what I see:

Sure enough, the content tree shows that the folders all migrated successfully:
But, we have just one final step: our original SQL Query for articles has incorrect NodeAliasPath and ParentNodeAliasPath values:
So let’s update our query to replace all instances of “TEST-Articles” with “Articles”:
SELECT
	 t.NodeName
	,t.NodeAlias
	,REPLACE(t.NodeAliasPath, 'TEST-Articles', 'Articles' ) as 'NodeAliasPath'
	,REPLACE(p.NodeAliasPath, 'TEST-Articles', 'Articles' ) as 'ParentNodeAliasPath'
	,a.ArticleTeaserImage
	,a.ArticleTeaserText
	,a.ArticleText
FROM View_CMS_Tree_Joined t
INNER JOIN View_CMS_Tree_Joined p
ON t.NodeParentID = p.NodeID
INNER JOIN CONTENT_Article a
ON a.ArticleID = t.DocumentForeignKeyValue
WHERE t.ClassName = 'CMS.Article'
Make sure to copy-paste this query into the ArticleRepository, then rebuild. Before running our migration again, let’s make sure to delete all of the “year” folders from the content tree so we don’t end up with duplicates.
Upon running the migration one final time, here are the results:
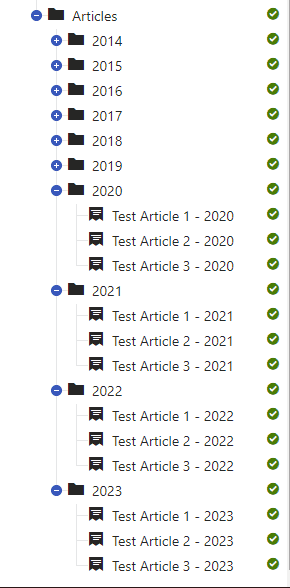
Our articles are all there!
As we conclude our exploration of Kentico migrations, it’s evident that the process is not just a straightforward transition but rather an intricate journey that demands patience and iterative development. Particularly for extensive use cases such as migrating product-related information like SKUs, the journey resembles a trial-and-error expedition where adaptability and persistence are key.
Migrating content requires an approach that goes beyond the technical stack. It’s about understanding the nuances of your data, understanding the capabilities of the Kentico API, and recognizing the unique challenges each migration can bring. The trial-and-error nature of the process means that unforeseen issues might arise, requiring adjustments, optimizations, and sometimes a complete overhaul of the initial strategy.
So, as you embark on your own Kentico migration adventure, remember that it’s not just about moving data from one place to another; it’s about adapting to the unexpected, refining your methods, and ultimately achieving a seamless transition that preserves the essence of your content while embracing the capabilities of the future. With patience and diligence, you’ll navigate through content migrations with ease and emerge with happy clients!
Are you looking to upgrade to Xperience by Kentico from Kentico 13? Visit our Kentico Upgrades page for all the details on migrating from versions 11, 12, and 13, or contact us to get started.
Stay up to date on what BizStream is doing and keep in the loop on the latest in marketing & technology.